Over the last couple of years, I have discovered that I have an obsession for gallery walls in my home. We have one in our master bedroom, one in Rory's
nursery, and one in the playroom so I guess it should come as no surprise that I decided we needed to have one in the living room as well. I used to be really overwhelmed by the idea of creating a gallery wall. I would see all these great ones on Pinterest and I felt so inadequate in terms of being able to create one in my own home. But at some point I decided to just go for it and it's been a love affair ever since. However, now that almost every room in my home has one, I guess I'm done.


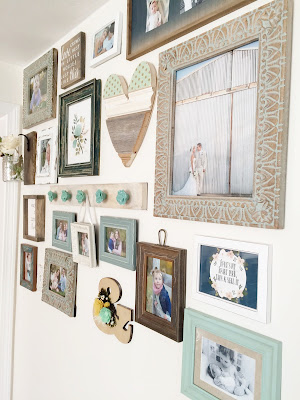

I've had a few people ask me "how" do you do this? Well, I like to incorporate a combination of things in my galleries. I use pictures as well as other wall decor with differing sizes and shapes in a variety of colors while still trying to maintain an overall cohesive look. For this wall, I purchased frames from a number of different stores. Home Goods, Kohls, Target, and Michaels are all great places to look. I also love framed art prints, wooden signs and wall hooks, as well as other original Etsy finds. Some of my favorite pieces in this gallery project are the wooden heart from
Olivewood Designs and the wooden signs from
Rustic Little Roost. I also advise using photographs that look as though they belong in the room in which you are putting them. I try not to put up photos where the colors we are wearing don't match the look of the gallery. This may limit the photos that you can hang, but in my opinion, it makes the gallery look so much better.


Ultimately, I think the biggest thing needed in putting together a gallery wall is patience. I didn't just wake up one morning and find everything I needed for my wall. It took weeks/months of collecting and searching for the right pieces to fit my wall. I started with a couple key pieces and built around them. As I was out and about with the girls, I'd randomly find new things that I knew would fit well with the look of my wall. Once I thought I had enough items to create a gallery, I measured my wall and then laid out all of the pieces in different configurations on the floor. I take pictures and try to decide what looks best before ever putting a hole in the wall. Sometimes, I lay the pieces out and realize I'm going to need a few more in order to fill the space but usually I then have an idea of the size of item I may need.
As far as hanging the items, I eyeball it. I know there are all kinds of creative ways to help you hang galleries, but I honestly look at my pictures of the layout and then eyeball where they are going to go, usually working from the corner pieces inward. I usually don't even mark the spots where I'm going to pound/drill. It may not be the most precise way to go about it, but it somehow works for me with little to no frustration and usually very few "whoops" holes.
I'm thrilled with this wall and it adds so much visual interest to my living room. Despite the fact that I love the wall, I'm always a little sad when my projects are completed. I guess it's on to the next thing, whatever that may be!


No comments:
Post a Comment