Showing posts with label DIY. Show all posts

Mar 21, 2016

DIY Living Room Gallery Wall

Over the last couple of years, I have discovered that I have an obsession for gallery walls in my home.  We have one in our master bedroom, one in Rory's nursery, and one in the playroom so I guess it should come as no surprise that I decided we needed to have one in the living room as well.  I used to be really overwhelmed by the idea of creating a gallery wall.  I would see all these great ones on Pinterest and I felt so inadequate in terms of being able to create one in my own home.  But at some point I decided to just go for it and it's been a love affair ever since.  However, now that almost every room in my home has one, I guess I'm done.


I've had a few people ask me "how" do you do this?  Well, I like to incorporate a combination of things in my galleries.  I use pictures as well as other wall decor with differing sizes and shapes in a variety of colors while still trying to maintain an overall cohesive look.  For this wall, I purchased frames from a number of different stores.  Home Goods, Kohls, Target, and Michaels are all great places to look.  I also love framed art prints, wooden signs and wall hooks, as well as other original Etsy finds.  Some of my favorite pieces in this gallery project are the wooden heart from Olivewood Designs and the wooden signs from Rustic Little Roost.  I also advise using photographs that look as though they belong in the room in which you are putting them.  I try not to put up photos where the colors we are wearing don't match the look of the gallery.  This may limit the photos that you can hang, but in my opinion, it makes the gallery look so much better.

Ultimately, I think the biggest thing needed in putting together a gallery wall is patience.  I didn't just wake up one morning and find everything I needed for my wall.  It took weeks/months of collecting and searching for the right pieces to fit my wall. I started with a couple key pieces and built around them.  As I was out and about with the girls, I'd randomly find new things that I knew would fit well with the look of my wall.  Once I thought I had enough items to create a gallery, I measured my wall and then laid out all of the pieces in different configurations on the floor.  I take pictures and try to decide what looks best before ever putting a hole in the wall.  Sometimes, I lay the pieces out and realize I'm going to need a few more in order to fill the space but usually I then have an idea of the size of item I may need.

As far as hanging the items, I eyeball it.  I know there are all kinds of creative ways to help you hang galleries, but I honestly look at my pictures of the layout and then eyeball where they are going to go, usually working from the corner pieces inward.  I usually don't even mark the spots where I'm going to pound/drill.  It may not be the most precise way to go about it, but it somehow works for me with little to no frustration and usually very few "whoops" holes.

I'm thrilled with this wall and it adds so much visual interest to my living room.  Despite the fact that I love the wall, I'm always a little sad when my projects are completed.  I guess it's on to the next thing, whatever that may be!


Aug 6, 2014

Gallery Wall: DIY

I have always been intrigued with the idea of doing a Gallery Wall in my house.  You know, the grouping and hanging of somewhat random (or perhaps not so random) things on a wall in your home.  I was for whatever reason, a little intimidated by the idea.  I hang tons of stuff on my walls, but the idea of finding a bunch of things that would look good together seemed challenging.  Plus, when I looked at Pinterest for inspiration, I always felt like I could never do something as pretty or as professional looking as what I see on there.

But, I have this very large wall in my bedroom and it's been blank for over 2 months now.  And I REALLY don't like blank walls.  It's like the walls are calling to me saying "put something on me," "cover me up," "don't leave me bare."  And, since I can't afford a really large, nice, piece of art, I decided to go for it and put up a gallery wall in my bedroom.  Surprise! As it turns out, I can do it.  And, I'm pretty happy with it.  So I thought it would be good to tell you my tips for doing your own gallery wall because it's really not as challenging as it seems!
First things first, gather some materials.  I would recommend finding 15-20 different "things" that you  think you could hang on your walls.  Try to find different shapes and sizes.  Picture frames are great, but I also think it's fun to add a couple of pieces that aren't necessarily photos.  Don't be afraid to not have everything match, but try to have a certain color scheme or vibe that you are going for.  Our bedroom has predominately dark wood furniture as well as vintage white pieces and light blue/green bedding, so I gathered my items based on that.
About half of the items I used on this wall, I already had.  I just went rummaging around my apartment looking for things that I wasn't using that would work on this wall.  The other half, I found at stores like Home Goods, Pier 1, Target, and Anthropologie.  But, I didn't get them all in one day.  I find it's best to find things over time and that way you don't feel like you are breaking the bank either.  If you know you eventually want to put up a gallery wall in your home, start browsing the hanging home decor sections at some of these stores and pick up a piece here or there.  Eventually, you will have enough to put together a wall.  Also, if you are using photos, find some that also work with your color scheme which helps to bring it all together.
Once you have enough items, I suggest finding a spot you can lay out all your pieces in order to find the best arrangement.  I used our bed, mostly because if I tried to use the floor Ryan would have been ALL up in that.  I tried LOTS of different arrangements.  I probably spent at least an hour or more arranging and rearranging these items.  I took pictures of the designs I liked best so that I could go back to them for reference.  I had about 20 different items and I only used 17 on my wall, so I kept switching out different things for others.
Once you are happy with the layout (on the ground), first make sure you have a picture of it before you start hanging!  Then, I have seen a couple ways of hanging.  Some people suggest tracing paper the size of each piece and then taping that to your wall so you know where you are hanging things.  I'm sure that works great.  But honestly, ain't nobody got time for that!  Okay, maybe some people do, but I don't.  Or I don't have the patience to do that.  Either way, I'm more a just take a hammer and go with it girl.  My large canvas print was my focal point, (almost) centered piece, so I started with that and worked my way out referencing the photo I had taken of the arrangement the whole way.
I may or may not have ended up with a couple of extra nail holes in my wall by doing it this way, but you can't see them and I feel like 2 extra nail holes can be considered nothing short of success.  At least in my book!
I'm pretty thrilled with the outcome and it almost makes me wish that I had another large blank wall in my apartment so I could do another one!


Jun 16, 2013

Daddy-To-Be Survival Kit

Happy Father's Day to all the Dad's or Dad's-to-be out there and an extra special Father's Day wish to my Daddy and my baby Daddy Josh!

Since we are only a of couple weeks, or who knows maybe a of couple days (though I doubt it for some reason) away from having Ryan here, I thought it only appropriate to gift Josh with a Daddy-To-Be Survival Kit that provides him with all the necessities a new Dad might need. 


Included in his New Dad basket are the following items:
  • Hershey's Hugs and Kisses
  • Pacifiers
  • Bibs
  • Hop on Pop and Love You Forever books
  • Rubber gloves
  • Clothespins
  • Ear plugs
  • Rattle
  • Band-aids
  • Condoms
  • Coffee mug and coffee
  • Six pack of Sierra Nevada
  • Onesie
When making your own, you could use any number of these ideas or make up your own that are appropriate for the Dad in your life.

This is one of my favorite parts of the basket.  There were no Relax My Daddy's "Almost" A Doctor onesies, but I think with basically one year left, he's close enough right? :)  If you are interested in purchasing one yourself, check out THIS SHOP ON ETSY


I think that Josh found this gift just about as cute and sweet as I did.  And now with all these items in hand, he has zero excuses for not being ready for this baby.  Right?


Jun 6, 2013

Nursery Reveal

Ryan's nursery is finally done! 

It's been a long time coming, but I have completely enjoyed the creative process behind designing a nursery for my baby girl.  I suppose the nursery is more for me rather than Ryan, since she would probably be fine in a pack-n-play until age 2, but I am happy that I got to create a special space for us.  It's quickly become my favorite room in the house.

My "theme" so to speak evolved over time, but overall, I wanted something with a vintage, shabby chic touch.  My color scheme was light neutral colors of beige, ivory, and petal pink.  My Mom was a HUGE help during the entire process creatively and financially.  I can honestly say it wouldn't have been possible without her.  I think she may be just as excited about her first grandchild as I am about my first child.

The room is small, so there is a lot of furniture packed into a small space, but I think since everything is light colored, it doesn't overwhelm the room too much.  I am posting links to MOST of the items in the nursery, just in case any of my readers (all 10 of you) might be interested.
Glider, Ottoman
Drape Panels, Sheer Panels, Window Hardware

Nightstand bought at an antique store in Downtown Bakersfield. 

Wall Frames
The beautiful light chandelier was a gift from my Cousin Courtney that she found at an antique store in Bakersfield.  It was the absolute PERFECT addition to Ryan's room.


Changing Table DIY
Shelf DIY, Pink Floral Knobs, Changing Pad Fabric
The changing pad cover, throw pillows, throw blanket, and porcelain doll dress were all sewn by my Mom with the same fabric linked above. The pink vases are from Michael's Arts and Crafts Ashland Collection and the fake flowers are from Michael's as well.  The wall clock was purchased at a scrapbooking store in Bakersfield.

Crib, Bedding
Letter DIY, Crystal Mobile DIY

White Plush Bunny, Pink Plush Bunny
The dresser was refinished just like the changing table was. Check out the above link to the changing table DIY to see how.
Basket from Kohls, spray painted white.

Mirror
The headband jar is from Michael's.  They have a large assortment (all shapes and sizes) of glass jars and vases that could be used for hair accessories.
Pink Lamp Shade

I bought the birdcage at Michael's as well as all the things that I filled it with.  A small pink bird, nest, moss, and fake flowers were assembled inside the birdcage.    The lamp base was purchased at an antique store in Bakersfield.  The "Ryan" piggy bank was a gift from my friend Julie.  My guess is that it's from Etsy.

Overall, the nursery is a combination of purchased items from places like Restoration Hardware Baby & Child, antique stores, and do-it-yourself projects.  While there was definitely a lot of money spent on some of the pieces in the nursery, I feel that by incorporating lots of DIY projects, I saved quite a bit of money and also have the satisfaction of knowing a lot of love and time was put into the room.

So, I'm in love with the room.  Are you?

Jun 2, 2013

And Her Name Is...

...RYAN!

We are still middle nameless, but baby girl's name has been Ryan for quite some time.  While I'm sure there are many opinions about using a traditionally boy name for a girl, let me just say that we love it and it just so happens to be her Daddy's middle name.  So it's special to us and if you aren't a fan, well, keep it to yourself please. :)


Once the name was finalized back in February when we first found out Ryan was a she, I got going on a DIY name project for her nursery.  All you need are some white wooden letters from Michael's, scrapbooking supplies in the color scheme of your choice, and a bit of Mod Podge. 


Trace the letters on the scrapbooking paper and then use an exacto knife to cut it as close to the wood letters as possible.
Then use a brush to Mod Podge the paper to the letters.  Watch out for bubbles in the paper!  I did two coats.
Decorate with stickers, paper flowers, ribbon, whatever.  And enjoy!


May 23, 2013

DIY Nursery Mobile

Today I finished yet another nursery project that's been on the backburner for quite some time.  I can't claim that I was the creative genius behind this idea.  It's hard to remember if I originally saw it on Pinterest or if it was just Googling nursery ideas, but the inspiration came from this blog tutorial (isn't her nursery adorable).  I did my crystal and pearl mobile very similarly but I will detail my exact way of doing it here because I tweaked it slightly.  If you are confused, you might want to check out the original one!

First things first, gather your supplies. 

You will need:

1. Wire wreath (originally green) spray painted the color of your choice.  I went with white.  This can be found at most craft stores but I got mine at Michael's.  The wreath will NOT have that cross thing in the middle. I added that (made from a coat hanger) because I wanted to add a string to the middle and I wasn't initially sure how I planned to hang the mobile and I wanted "options."  Adding this is not necessary though.
2. Crystals, pearls, beads.  Again, go to Michael's and check out their jewelry making section.  They have TONS of colors and beads to choose from.  I used a couple different sized clear crystals as well as baby pink pearls.  However, word to the wise, go on a day they are having a sale or a day where you have a coupon.  Depending on how many strings and beads you plan to use, this can be a little pricey.

3.  Fishing line to hang from ceiling (#20 found at Sports Chalet), jewelry making line (#6 found at Michael's), and whatever you want to use at the top around the wreath.  I used burlap and a white rose ribbon.
4. White Swag Hook Kit.  Can be purchased at Home Depot.

The first thing I did was using the 20# fishing line, tie 6 long strings to each of the "knobs" on the wire wreath.  You are going to want to make sure this thing is level before you hang a bazillion strings of crystals to it.  I didn't have much of a problem leveling this out.  I then tied all six strings in about 1 million knots 4-5 knots.  I left excess line at the end to use to hang the mobile with.

**Note: You are going to need to find a place to hang this mobile while you are making the strings and attaching them as to avoid it getting into a tangled mess.  I used a top closet rail.

Then, begin making your strings of beads with the #6 line.  I did this "semi" randomly.  I say semi because while I didn't specifically measure the length of each string or how far apart the beads were from each other, I did have a somewhat pattern that I was following to even out the look.  This was partially because I was using different sized and colored beads.  If you are using the same beads for the entire mobile, this would probably not be as important but I didn't want the same color and size to end up all in the same place.  Maybe I'm a little OCD.
I tied strings to all four rings of the wreath and had no real issue with tangling as long as it was hanging.  I would say I ended up with approximately 50 different strings of beads.

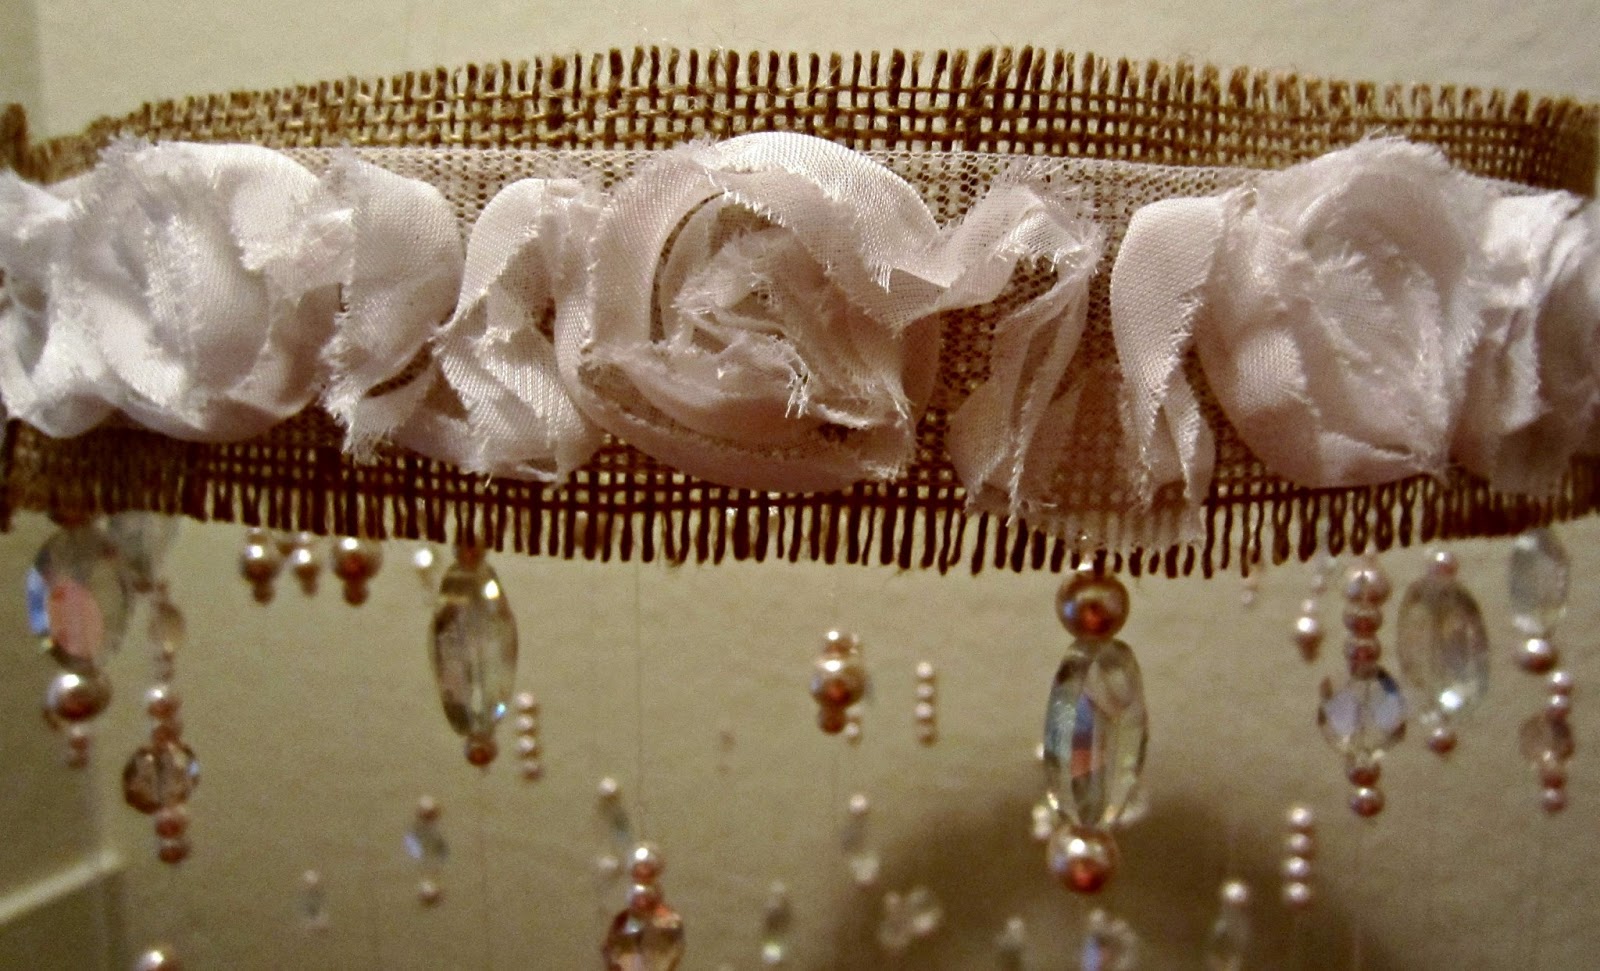
I then cut and hot glued the burlap and lace flower ribbon together.  If you've ever dealt with burlap, then you know it can be difficult to use.  My nursery theme is "vintage-shabby chic" so I was okay with the fact that the burlap isn't cut perfectly.  If that's not your style, check out some other types of fabric or ribbon.  Then, hot glue the burlap to the outer ring being careful not to melt the fishing line that you used.
Lastly, I used a white swag hook kit from Home Depot to hang the mobile over the crib. I ended up just tying a knot and looping it over the swag hook.  So far it seems to be hanging very well.


I'm really happy with how it turned out.  I think it looks a lot better in person because my little point and shoot camera fails to pick up the "sparkle." But it's so sweet and adds so much to my nursery!


If you decide to make one, good luck!  And I can't wait to see how yours turns out. :)